That Belated Tutorial - Halo Ghost
Ok, so I know I promised a soon to follow tutorial to make this a couple weeks back, but my 9yr old brother in law came to stay for the week, and he was a lot harder to deal with than I anticipated. Anyway, today he is gone, so today I bring you that much belated tutorial.
First off, preparation. For this model you will need one Tau Piranha and one Space Marine Bike. I also used an Imperial Guard Heavy Bolter, and a couple of IG Sentinal Missile Launchers. Neither of these are necessary, you can use the weapons provided by the piranha quite well, I just wanted different weapon systems for the build I'm doing.
Of course, you won't need all the bitz from the bike and Piranha, just the bitz shown below.
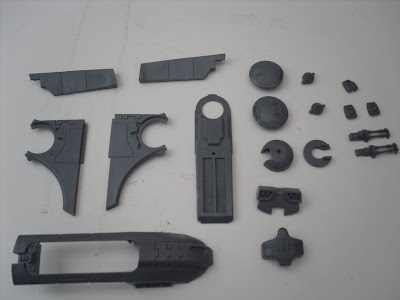

A few of these bits had to be trimmed/filed down some. The space marine legs had to be shaved back to be level with the knee (use the piranha body as a guide to how narrow they need to be) which looks a little odd but will be hidden by the model. I trim the parts off the bike designed to hold wheels (for obvious reasons) and I adapted the guns to hold the heavy bolter. I also have some magnets I got from ebay that I will use to make my missile launchers removable - again, this bit is entirely optional. I then proceeded to glue any obvious halves together (bike, space marine body, missile launchers...) I also shaved the tau iconography off the shoulder pads, and trimmed the marine backpack mounting from the marine rear body. The results are below.


I plan to glue the drones in place as part of the chassis, so was able to use them as my missile launcher mounts. With this in mind, I glued magnets in the hole normally reserved for the flying base.

With preparation complete, it was on to assembly. To start, I glued the sides and back piece to the piranha body.

Next came the tricky stage. I put the legs in from underneath, then hooked the saddle under them while bringing the bike in from above. I then put glue on the piranha floor piece, and brought it up from beneath. A little glue dribbled down the inside of the body where the legs are flush against it will hold your man in place quite well. I then glued the body and arms in place before the glue was dry on the legs, in case I needed to reposition them slightly. This is the tricky bit with any biker though, not just this project! :oP


I then took one of the heads bought especially for this project, from pig iron productions. This doesn't fit perfectly in the space marine collar, so a small dab of green stuff needs to go in for this to sit in. I then tidy the green stuff around the edges.

I added the Tau backpack and shoulder pads to the marine body. I plan to do the same thing for the rest of the marines (spartans) in this project :o)
I then secured my gun in place in it's mounting. I then dry fit the wings, as I would have to trim these just a little to get round the gun mounting. In the second image below, the wing on the right has already been trimmed - not much needs be removed.


Next I glued the drones in place as missile launcher holders. Finally, I cut some plasticard to fill the back of the cockpit (where the second Tau would normally sit) You'll need to put a piece in the top and on the rear. I recommend doing the top first, as this lets you poke a file in the rear to help you get the positioning right (a mistake I made with the prototype, but managed to salvage well enough!)
The other mistake I made with the prototype was to glue the flying base stand piece to the ghost... BEFORE I undercoated it. So one of my ghosts will have a black tipped stand, but the other I will definitely do clear. Here's a final few shots of the model.


A detailed tutorial. I don't like Halo myself but this is an awesome conversion and I'm looking forward to seeing the entire army done.
ReplyDeleteNice tutorial! I'm not familiar with the original Halo model, but it looks awesome!
ReplyDeleteThe "Entire Army?" It's for winds of war, so two combat patrol forces - it doesn't amount to much Chris :oP It'll be a couple ghosts each, some Warthogs and a bunch of Spartans running around. I think it'll look cool, but there's not all that much to do :oP
ReplyDeleteAnd thanks Frag_Dad, I've shown it to a dedicated Halo gamer who has nothing to do with Warhammer and he recognised it and thought it quite good, so I'll take that as a decent endorsement :oP
that does look pretty awesome ginge, and fairly easy to replicate. going to have to make a start on winds of war after escalation.
ReplyDeleteThe fidgety bit is getting the rider right, but like I said I've had that trouble with every biker I've ever made. I guess cutting the plasti-card is fiddly too but you're cutting square shapes so not that difficult.
ReplyDeleteThe one I'm not looking forward to is the warthog - I hate working in resin, and I can see beefing up the crew is gonna be a bitch of a job. Looking at the bitz, I think the driver is gonna have to stay on the small side at least. Can hopefully change the gunner.